• Home
  • Shop Now
  • My Blog
  • Facebook
  • About Us
  • My Studio
  • FAQs

Tiffany Brooks Designs

Category Archives: Tutorials

DIY, Burlap Wreath Tutorial

01 Monday Dec 2014

Posted by Tiffany Brooks in Decorating, Tutorials

≈ Leave a comment

Tags

burlap wreath, burlap wreath tutorial, Christmas wreath, DIY burlap wreath, DIY wreath, wreath


Burlap Wreath Tutorial Cover

I have made plenty of wreaths over the years but never with burlap. I researched a few tutorials I came across on Pinterest and decided to try a few of the techniques used. After a few hours and several different techniques I was about to give up on making a new Christmas wreath. Eventually I came up with my own technique that gave me the fluffy looking burlap wreath I was envisioning.

I have made plenty of wreaths over the years but never with burlap. I researched a few tutorials I came across on Pinterest and decided to try a few of the techniques used. After a few hours and several different techniques I was about to give up on making a new Christmas wreath. Eventually I came up with my own technique that gave me the fluffy looking burlap wreath I was envisioning.

Supplies Needed:Supplies

  • floral wire or pipe cleaner
  • scissors
  • wire wreath
  • burlap


I believe my wire wreath frame was 24″. Since my frame was so large I used two rolls of 6″ x 10 yd rolls of burlap ribbon from Linen Table Cloth.


Step 1

This is one technique I did find in another tutorial that I really liked.

Cut a piece of wire about 10″ long and carefully weave the wire through the burlap. Once you have weaved the wire through the burlap, hold both ends of the wire and slide the burlap towards the center of the wire. Once gathered, secure the gathers by twisting the wire tightly around the burlap.

Step 1 Gathered

Using the same wires you secured your gathers with, you can now attach to the outer edge of your wreath frame. Step 2 Attached to WreathMeasure Burlap

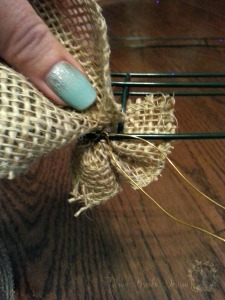
I wanted all of my loops to be a close to the same size so I devised my own method to measure the sections before I wired the loops to the frame. You can certainly eyeball your loops or use a ruler.  I utilized two of the sections lengthwise to get the same length for each of my loops prior to wiring my loops to my frame. Be sure to cut your wire long enough to form your loop and to secure it to the frame.


StepsAfter you have your burlap measured to your desired loop size, you will attach the wire used to make your loop to the third section of frame.

You will repeat this process: outer edge to third frame section. I never attached any of my loops to the second or inner frame edge.

In one of my previous attempts I triedto attach my loops to all four sections and my loops were not as puffy as I wanted them.

Be sure not to tie your wire to tight as you want your loops to move freely on the frame. This will not affect your finished wreath.

Finished No Bow

Now that I have completed looping my burlap around the entire frame, I can move the loops around as needed and fluff the loops.

Bow

The best part of making my own wreaths is selecting the ribbon for my bows.

Fortunately, after Christmas last year I was able to get a great deal of Christmas ribbon at Michael’s Craft Store. I had so many different spool of ribbon to chose from I could barely decide.

Finished with BoxFor my wreath I do not want to add anything other than a bow. If I had chosen a smaller wreath frame I might have added berries or holly.

Now it’s time to hang my new Christmas wreath outside and enjoy it!

Christmas Burlap Wreath Finished (1)

I hope you have found my tutorial helpful. Stay tuned for my next tutorial, How to Make A Bow!

How to Make a Steampunk Costume on a Budget

07 Tuesday Oct 2014

Posted by Tiffany Brooks in Halloween Costumes, Sewing, Tutorials

≈ 2 Comments

Tags

steampunk, steampunk bustle, steampunk corset, steampunk costume, steampunk jacket, steampunk skirt

Utilizing as many supplies that I already had on hand was essential in keeping down the cost for my steampunk costume this year. I want to be able to create and entire costume with accessories for under $50.00 dollars. The main costume would be made by recycling this unused black formal dress. By cutting the dress at the waist line, I now have a corset top and a skirt.


I added a zipper and a waistband to the skirt. The length was perfect so there was no need to hem as I never cut the bottom of the skirt. I then added a sequin lace trim to the bottom of the skirt. My skirt is now complete.

The corset top took a little more time than the skirt as there were several things that had to be added. I first added a separating zipper to the back of the top. I then added a gathered brocade trim to the bottom of my top to add a little extra length. I added matching straps to ensure I would be comfortable in my costume throughout the entire festival. Finally, I added a sequin and beaded trim to the top of the corset to add just a little more height to the top.

Now its time to make my bustle using the same brocade fabric I purchased for the corset top trim. Since the bustle is detachable from the skirt it will have it’s own waist band. This will make it easier to use this costume for other festivals.


Now I am finished with my main steampunk costume but I need a jacket. So back to my closet for something else that can be recycled. As I had hoped, I found the perfect jacket that I haven’t worn in years. First I shortened the sleeves to 3/4 and added a pleated black polyester trim. Even with the shortened sleeves and black trim, the jacket was still a little too plain for the rest of my costume. By adding elastic bridal button tape down two seams on the back of the jacket, I was able to give the jacket a lace up corset look. Now this completes the jacket.

Now my costume is ready for opening day of The Annual Carolina Renaissance Festival.

I was able to make this entire costume: corset top, skirt, jacket, bustle, for only $ 14.08. My accessories for my purse, hat, and necklace cost $28.74, keeping my costume and accessory total under my $50.00 budget. Being able to recycle the dress, purse, necklace, and utilized items I already had on hand I saved a lot of money.

Total steampunk costume and accessory break down:

  • Costume $14.08
  • Steampunk hat $10.33
  • Gear and clock key necklace $3.61
  • Purse $14.80

For a total of $42.82 I have a complete 3 piece Victorian steampunk costume with matching accessories.

Check out my other blogs to learn how I made my hat and necklace.

How to Make a Steampunk Hat

How to Make a Steampunk Necklace


How to Make a Steampunk Hat

07 Tuesday Oct 2014

Posted by Tiffany Brooks in Halloween Costumes, Tutorials

≈ Leave a comment

Tags

make a steampunk hat, steampunk, steampunk costume hat, steampunk hat

I first had to decide what did I want on my hat. Most steampunk hat’s I have seen on the internet had goggles on the hat and I wanted to do something different.

Supplies

  • Gears
  • Old clock (optional, for real gears)
  • Flowers
  • Feathers
  • Clock Keys
  • Clock hands
  • Trim
  • Hat
  • Hot glue gun
  • Other steampunk accessories
  • Vinegar (optional for tarnishing gears)

I looked at several craft stores for gears but not many carried real looking gears. So my next option was to take apart an old clock that was in the closet. After removing all of the gears from the clock, I realized they needed to be slightly tarnished. In order to slightly tarnish the gears, I dipped them in apple cider vinegar a few times and allowed to air dry in between dipping.


I found the perfect mini top hat at Wal-Mart in the costume section. The hat already had a ribbon band and tulle so I just removed it as it would not match my steampunk costume theme. I had just enough trim left over from my steampunk costume to use as a hat band. Using hot glue, I attached the trim to the hat.


After the hot glue was cool I started to decorate. I placed all my accessories on my hat prior to hot gluing them. This would save time and supplies if I didn’t like the completed look of my hat.

Here is my completed steampunk hat. I absolutely love everything about my hat and I cannot wait to make another one.

Total hat cost was $10.33. The only items I had to purchase to make this hat was the hat, brown feather pick, and the clock keys. All other accessories I already had on hand.

Be sure to check out my completed steampunk costume and necklace.

How to Make a Steampunk Costume on a Budget

How to Make a Steampunk Necklace

How to Make a Steampunk Necklace

07 Tuesday Oct 2014

Posted by Tiffany Brooks in Halloween Costumes, Tutorials

≈ Leave a comment

Tags

steampunk, steampunk accessories, steampunk jewelry, steampunk necklace

I love recycling items I already have on hand when I am making costumes and accessories. For my steampunk necklace I was able to recycle a necklace I haven’t worn in years.

Supplies

  • Old necklace (jewelry making starter kit)
  • Needle nose pliers
  • Gears
  • Keys or other accessories

Utilizing needle nose pliers, I was able to careful take apart the old necklace and add gears and clock keys I bought at Michaels Craft Store.


Now I have a steampunk necklace that I can use time after time. I also can add to this necklace at any time. Total necklace cost $3.61. It is just amazing how much money can be saved by utilizing as many things you already have on hand.

You can make all kinds of steampunk jewelry out of old jewelry or by purchasing a jewelry making starter kit from your local craft supply store.

Be sure to check out my other blogs.

How to Make a Steampunk Costume on a Budget

How to Make a Steampunk Hat

How to Build a Fairy Garden

27 Sunday Apr 2014

Posted by Tiffany Brooks in Gardening, Tutorials

≈ 2 Comments

Tags

fairy garden, fairy house, fairy village, mushroom fairy house

For my fairy garden I have shopped in all departments of various stores to find my pieces. There are no special supplies needed to build a fairy garden or as mine is called a fairy village.

Fairy Garden

My favorite piece is this natural looking reptile ornament from PetSmart. I love how the wood is shaped and how the branch sticks out just right to hang a small bird cage on. Since the lanterns I made from succulents and moss were too big to hang from this piece, I found miniature bird cages from Michael craft store.

Fairy Garden (13)Fairy Garden (3)

I was able to find a great selection of doors in various sizes at Hobby Lobby. The doors can be placed in front of tree trunks or rocks.Fairy Garden (15)

Fairy Garden (1)
Fairy Garden (17)


Also at Hobby Lobby I found a great selection of fairies to use throughout my fairy village. Some of the fairies can stand in my garden and others were on metal sticks to look as if they were flying or hovering over my flowers.

Fairy Garden (6) Fairy Garden (16)

Supplies found at Hobby Lobby:

  • Mushroom table and chairs
  • Cement bench
  • Metal swing
  • Mushrooms
  •  Weathervane
  • Stone fence

Fairy Garden (7)

Supplies found at JoAnns:

  • Gnomes
  • Fairy houses
  • Tiny doors
  • Mushrooms

Fairy Garden (5)Fairy Garden (2)

Fairy Garden (4)

Supplies found at Walgreens:

  • Tinker Bell pot sitter
  • “I Believe in Fairies” stepping stone
  • Mosaic garden lights

Fairy Garden (18)Fairy Garden Banner

Supplies found at Wal-Mart:

  • Gnome pot sitters
  • Mushrooms

Fairy Garden (12)Fairy Garden (11)

I have found so many different sizes of mushrooms to add to my fairy village. The big mushrooms with a door added will look like a fairy house. The small mushrooms are great accent pieces throughout the village.

Fairy Garden (14)Fairy Garden (9)

Every piece I bought for the fairy garden I sprayed with a clear coat to help protect from the sun and rain. When the fall comes I am going to pack everything up and store it in the garage till next spring to help it last longer. If you are going to spray your pieces before sitting them out, be sure to buy a spray that is for the type of material your pieces are made of.

Fairy Garden (19)Fairy Garden (20)


How to Turn Garden Lanterns into Fairy Houses

27 Sunday Apr 2014

Posted by Tiffany Brooks in Gardening, Tutorials

≈ Leave a comment

Tags

fairy garden, fairy house, fairy lantern

One afternoon as I was shopping in Walgreens I came across some tea light garden lanterns. I eyed these lanterns several times as I was there shopping. Eventually an idea came to me to make these lanterns into fairy houses.

Lantern House Supplies

Supplies Needed:

  • Lantern
  • Burlap
  • Sphagnum Moss
  • Soil
  • Succulents
  • Fairy Door
  • Fairy
  • Floral Wire
  • Wire Cutters

I found all of my supplies a various store in my area. The sphagnum moss can be found in your local pet store in the lizard section. Burlap can be found at any fabric store. The succulents I bought at Lowe’s. The fairy door I used I found at Hobby Lobby.

I lined the lantern with burlap fabric and filled with dirt. After filling with dirt I began to cut holes in the burlap for the succulents to be placed in.

20140310_174741

Now you can start adding succulents and sphagnum  moss to your lantern.

Succulents in Lantern

Add the succulents and moss to the top and three sides of your lantern. If you are not adding a door to your lantern like I did you will want to cover all four sides with succulents and moss. Once you fill each side take floral wire and secure your succulents into place. Do not tighten the wire to much as you may prevent your succulents from growing.

Lantern with Door

Here is what my lantern looks like with only the top finished and a door in front. When I am finished adding my succulents and moss to the sides I am going to glue my door on to the lantern just in case I decide to hang my lantern.

Lantern on Chair

Simple DIY Wine Cork Napkin Rings

12 Wednesday Mar 2014

Posted by Tiffany Brooks in Crafts, Decorating, Tutorials

≈ Leave a comment

Tags

cork napkin ring, napkin ring tutorial, wine cork napkin ring

As I set my table the other day I realized just how boring it was with my folded napkins.

Napkin Rings  (4)

So naturally I start wondering what could I make napkin rings out of other than toilet paper rolls. Naturally I start looking at Pinterest for ideas and this is what I came up with…..

Napkin Rings  (2)

Supplies needed

  • Wine Corks
  • Heavy Wire (I used 16 gauge wire found in the jewelry wire)
  • Wire Cutters
  • Something solid to wrap your wire around to get the perfect rounded shape. (I used a plastic meat flavor injector from my kitchen)
  • Tiny screwdriver to make hole for wire. (I used an eyeglass size screwdriver)

Napkin Rings  (1)

Step 1

Soak your corks overnight in a glass of water. This will make it easier to stick the screw driver straight in. They can soak until your ready to make them.

Step 2

Once you wipe the excess water off your corks take your screwdriver and stick in to desired place on corks. Remember your screw driver should not be any wider than your wire. You will not see a hole like you occasionally see with a cork screw. This is good!

Step 3

Take your wire and wrap it around what ever you have found to get your shape. Wrap the wire until it has the desired look you want. Remember to leave enough room on each end of your wire to stick into the cork. I stuck mine in about an inch on each end.

Step 4

Cut you wire and place each end into the cork.

Step 5

Shape your napkins as desired and pull through napkins ring.

Napkin Rings

Napkin Rings  (3)

Be sure to check out the other wine cork napkin ring ideas on Pinterest when you get a chance. Enjoy!

Dancing Ghost, Halloween Decorating

21 Monday Oct 2013

Posted by Tiffany Brooks in Decorating, Halloween, Tutorials

≈ Leave a comment

Tags

dancing ghost, DIY ghost, DIY Halloween ghost, Halloween decorating, Halloween decorating ideas, Halloween ghost, trash bag ghost

Last year (2012) I found some wonderful ideas for Halloween decorating on Pinterest. Fortunately, I was able to try one of the ideas I saw. I have since deleted that pin from my Halloween board, but I did notice others have pinned similar ghost although many are dead end links. 

To make my dancing ghost/ floating ghost I used several things I already had laying around the house.


Supplies Needed:

  • White trash bags, one for each ghost
  • Clear plastic painters drop cloth
  • Stakes
  • Newspaper
  • Black sharpie
  • Scissors
  • String
  • Sticks from around yard (for bonfire)
  • Candy corn lights (or whatever you like, I already had these on hand)

Directions

  • Cut away the top of your trash bag (side with the draw string)
  • Cut your painters drop cloth into enough pieces for each ghost. I laid mine out without unfolding it all the way, and cut into 5 pieces/ strips, then trimmed as needed.
  • Ball your newspaper up into your desired head size.
  • Take your newspaper head and cover with your plastic painter’s drop cloth.
  • Now place this inside your trash bag bottom corner.
  • Place your stake into the ghost. (I used bamboo type stakes I bought from the dollar store for my vegetable garden and taped two together for my desired height)
  • Tie a string around the base of the head to make neck.
  • Take your black sharpie and draw your faces on your ghost.
  • Now take your ghost to your desired location in your yard.
  • Place ghost in desired position.
  • Cut a 3″ strip on each side of your ghost for their arms.
  • Now tie their arms together to make them looks as if they are dancing.
  • Now you’re ready to build your bonfire from the sticks you collected.
  • Place your candy corn lights throughout the stick pile for a bonfire look.
  • I used a small hook from my garden with a green colored solar light to add to the look of my bonfire.


I cut strips on one of my ghost all the way around as suggested in the tutorial I read but I did not like this look so I did not do it to all the ghost. When the wind blew these ghost were amazing.

After Halloween I placed ghost together in my storage area for this year. They were a little weathered but that was okay. The weathered look gave them a great spooky look. Will do another blog on how I reused these ghost this year.


Here is my daughter’s sick pumpkin. I thought I was going to die when I saw this. My only thoughts were who was going to clean that up after Halloween, and would it attract bugs. Fortunately, there was no bugs and the cleanup was fast and easy.

Halloween Tree Decorating

13 Friday Sep 2013

Posted by Tiffany Brooks in Decorating, Halloween, Tutorials

≈ Leave a comment

Tags

Halloween decorating, halloween door hanger, halloween tree, halloween wreath


Normally I do not put up a tree for Halloween but this year as I was making my wreath and door hanger I started thinking of adding a matching tree to the front porch.

The colors I wanted in my door hanger and wreath/ witches broom were purple and orange. From there the wheels in my head began to spin with ideas for decorating a tree.

Supplies

  • Tree
  • Lights
  • Mesh Curly-Q’s
  • Decorations
Fist, add lights of your choice to the tree. I prefer purple lights on my Halloween tree but have seen many different types of Halloween lights. I am sure the candy corn lights would look amazing on a tree. Second, attach the mesh curly-Q’s throughout the tree. If you do not know how to roll mesh into curly-Q’s check out my How to Roll Mesh Blog. Finally, the fun part, decorating.


The tree topper is one of my favorite things about any tree. I originally was going to use a witch hat as the topper until I found this owl at Michael’s Craft Store. They add a little color around the owl and mesh I choose a few different colors and style of sprays.

I had no idea what I was going to put on the tree except for the felt witch hats I had added to my door hanger and witches broom. One of the first places I always look for decorations is the Dollar Store. I usually do not find actual tree decorations there but instead I find knickknacks that I turn into tree decorations. I found the cutest shelf sitters: pumpkin, mummy, and skeleton at the Dollar Store. I used my floral wire and wrapped it around their necks to get them to sit on the tree limbs. Another great find at the Dollar Store was the black birds and the fuzzy black owls.


At Michael’s Craft store I found the most amazing witches to hang on my tree. I have to say the witches are my favorite part of my Halloween tree.

Once I finished decorating I realized I needed a tree skirt to complete my tree. So I made a reversible tree skirt that I would be able to use on other holiday trees I do throughout the year.

 Happy Halloween! Be sure to check out my other holiday decorating ideas while your here.

How to Roll Mesh

10 Tuesday Sep 2013

Posted by Tiffany Brooks in Crafts, Tutorials

≈ Leave a comment

Tags

deco mesh rolls, how to roll mesh

One of my favorite ways to decorate my holiday trees and wreaths is by rolling my mesh into curly-Q’s.


STEP ONE – GATHER SUPPLIES
  • Scissors
  • Ruler
  • Pipe cleaner or floral wire
    • If using pipe cleaner cut each pipe in half. If using floral wire cut wire pieces approximately 4″ – 5″ long
    • I have used both pipe cleaner and floral wire and I like them both. Cost wise floral wire is cheaper and last longer.
  • 10′ rolls of mesh in your desired color or colors
  • Tree or wreath
    • (The only store in my area that sales the mesh is AC Moore Arts & Crafts. Regular price is $9.99 a roll so I wait for it to go on sale for under $5.00 or I use a 40% off coupon.)
  • Be sure to add lights to your tree before adding curly-Q’s.
STEP TWO – CUT
Start by unrolling your mesh on a flat surface. Unroll a small amount of mesh at a time as the mesh will want to roll back up. Sometimes I lay something heavy on top of the mesh to keep it from rolling while I cut.
I cut my mesh in to 6″ strips.  This is not something you have to measure out with every cut. Just eye ball it and cut away. Since you are rolling these after cutting precise measurements is not necessary.
STEP THREE – ROLL AND ATTACH
After cutting your desired amount of strips you will want to begin rolling each strip from the center (cut side) attach two curly-Q’s together with one piece of pipe cleaner or floral wire.
    Smooth ends- roll evenly          Pointed ends- roll at an angle

STEP FOUR – PLACE IN TREE

Once you have made your desired amount of curly-Q’s, begin sticking them in your tree. You can stick them in your tree or use the wire you wrapped around the two curly-Q’s to attach to the tree branches. If curly-Q’s are stuck into the tree far enough they will not fall out.

Once you have attached or placed all your curly-Q’s to your tree you are ready to decorate.
For the tree pictured I used both pointed and rounded curly-Q’s.
If using your curly-Q’s on a wreath such as a grape vine wreath, you can us the wire to attach curly-Q’s to the wreath just as you would do on your tree.
← Older posts

I am so excited to share my love for sewing, decorating, organizing, gardening, and cooking with you. I am a SAHM of a beautiful seventeen year old. Ah... teenagers. I love to do just about anything craft and sewing related. There's nothing better than doing what I love everyday and the best part it never feels like work

Follow Tiffany Brooks Designs on WordPress.com

Search

Categories

  • Announcements (17)
  • Birds (1)
  • Crafts (2)
  • Decorating (6)
  • Gardening (2)
  • Halloween (3)
  • Halloween Costumes (8)
  • Holidays (4)
  • Organizing (3)
  • Party Ideas (5)
  • Pets (6)
  • Recipes (6)
  • Sewing (15)
  • South Hill Designs (17)
  • Tutorials (11)
  • Tutus (5)

Recent Posts

  • Klockwork Handling, Professional Dog Training, AKC Canine Good Citizen Evaluator
  • My First Plum Paper Planner is Ordered!!!
  • Ms. Hildy and Her Custom Couture Dog Dress with Pick Ups
  • Introducing the South Hill Virtual Locket Designer
  • South Hill Designs, New Product Reveal

Follow Me

Archives

  • October 2015
  • June 2015
  • March 2015
  • February 2015
  • January 2015
  • December 2014
  • November 2014
  • October 2014
  • September 2014
  • August 2014
  • July 2014
  • June 2014
  • April 2014
  • March 2014
  • February 2014
  • January 2014
  • November 2013
  • October 2013
  • September 2013
  • July 2013
  • February 2013
  • January 2013
  • October 2012
  • July 2011
  • May 2011
  • April 2011

Blogs I Follow

  • Tiffany Brooks Designs
  • DIG THIS!!!
  • Dirt Church
  • southerndisposition.blogspot.com
  • My Polka Dotted Bliss
  • Ruffles And Stuff
  • Mommy by day Crafter by night
  • On My Side of the Room
  • Shabby Blogs
  • The Cottage Mama
  • The Daily Post
  • WordPress.com News

Enter your email address to follow this blog and receive notifications of new posts by email.

Join 2,801 other subscribers

Meta

  • Register
  • Log in
  • Entries feed
  • Comments feed
  • WordPress.com

Create a free website or blog at WordPress.com.

Tiffany Brooks Designs

DIG THIS!!!

Life.....Dig it!

Dirt Church

My Polka Dotted Bliss

Ruffles And Stuff

Mommy by day Crafter by night

On My Side of the Room

Shabby Blogs

The Cottage Mama

The Daily Post

The Art and Craft of Blogging

WordPress.com News

The latest news on WordPress.com and the WordPress community.

Privacy & Cookies: This site uses cookies. By continuing to use this website, you agree to their use.
To find out more, including how to control cookies, see here: Cookie Policy
  • Follow Following
    • Tiffany Brooks Designs
    • Already have a WordPress.com account? Log in now.
    • Tiffany Brooks Designs
    • Customize
    • Follow Following
    • Sign up
    • Log in
    • Report this content
    • View site in Reader
    • Manage subscriptions
    • Collapse this bar
 

Loading Comments...
 

You must be logged in to post a comment.