Klockwork Handling, Professional Dog Training, AKC Canine Good Citizen Evaluator

Tags

, , , , , , , , , , , , , , , ,

My daughter and I recently had the pleasure to work with Katelyn Locklear Bishop, dog trainer and an official AKC Canine Good Citizen Evaluator at Klockwork Handling in Hope Mills, North Carolina and this would turn out to be one of the greatest experiences in our lives. Let me first tell you what brought me to Klockwork Handling.

Alii Cover TBD

This past September, my daughter and her then 7 month old German Shepherd Alli came to stay with us as her husband was headed to Georgia for Airborne school. This would be the first time I would meet Alli since they got her when they were stationed in Texas. I could barely contain my excitement, for the past several months I had received countless pictures and video messages, all mostly containing the antics of Alli.

Alli Chip Bag TBD

As a German Shepherd, Alli is a loyal and protective breed by trait and this had slowly become an issue for my daughter in public places. As Alli got older it was apparent they would not be able to take her out to public places as much as they could when she was a small puppy. The protective trait had become so over powering that my daughter was asked to leave PetSmart only days before they headed back home to North Carolina.

Alli Muzzle TBD

During their stay here we knew it would be best to get Alli spayed with our favorite and most trusted vet Dr. Kim at North Star Veterinary Hospital. As we entered the vet it was very clear it was not going to be as easy as we had hoped. Once Alli’s weight was taken we were sent straight to a room so Alli could calm down as I filled out paperwork. Once the vet tech came in to get her it was clear she was going to have to be muzzled in order to get her to the back for her surgery.

As Dr. Kim passed us in the hall she said “I know a great trainer you can take her to”. Training is something we had already considered and even booked with someone for the weeks my daughter was home. Days before our appointment I canceled as I did not see how much it would help for a stranger to come once a week for four weeks to my home. After all the issues we were having with Alli stretched beyond the home.

That evening I called Klockwork Handling and left a message for Katelyn Bishop and anxiously awaited her call back. It did not take long for my call to be answered and after the first few minutes of my conversation with Katelyn, I knew instantly this was where Alli needed to go. We would drop Alli off at Klockwork Handling in Hope Mills, North Carolina for one week. While Alli was there she would learn basic commands and be conditioned to some public places after being comfortable in low key situations at Klockwork Handling.

Alli Group

It was hard to drop Alli off with someone who was a complete stranger to us but with such high praise from Dr. Kim and her staff it would turn out to be one of the best decisions we could make. It was such a treat for us to follow along with Alli’s training and progress on the Klockwork Handling Facebook page.

Alli (1)

Each day we would see pictures and at times videos and watch in amazement at the astonishing progress Alli was making with Katelyn. Progress my daughter would only dream about but never think could happen. Alli was able to go to the park and watch the people and children around her and a field trip to PetSmart.

Alli with Katelyn at VetOn the day of pick up Katelyn arranged
for me to meet her at the vet office since my daughter had already gone to
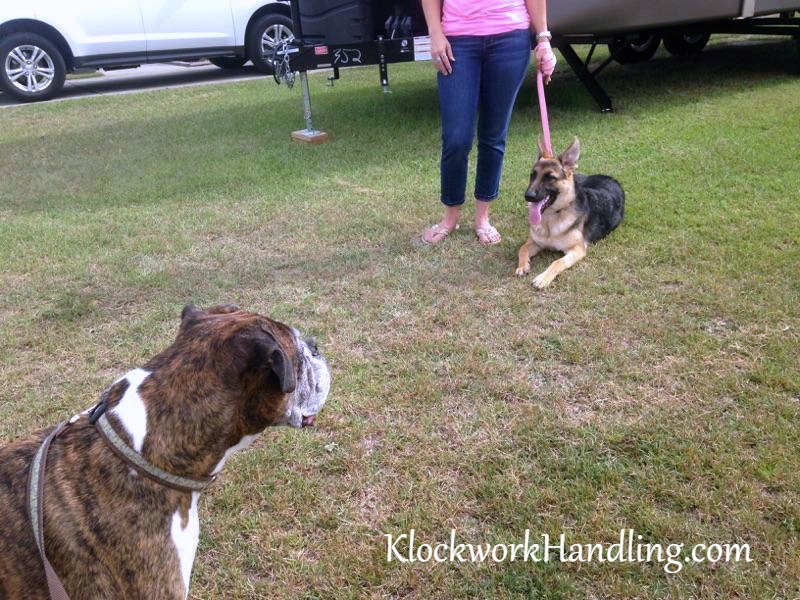
Kentucky to be with her husband. This would be the final day of training and one of the scariest places Alli has been. I got to the vet to see Katelyn walking Alli around outside. As they walked I went in to not disrupt her training and observed sit stays and down stays as Alli was conditioned to her surroundings. Before long they came in and I continue to sit in the waiting area to observe the way in which Katelyn handled Alli in public places with new people and sounds.

I sat anxiously and quietly avoiding any eye contact with Alli while I observed in complete disbelief. Of course everyone at the vet knew who Alli was, not by seeing her, my daughter or me but by hearing Alli and her very loud barking and lunging. Not this time!! Alli and Katelyn entered and believe it or not, silence followed by a sit stay. The staff was just as shocked as I was. I even heard a few staff members walk by and say “she is great, she trained my dogs”. I was able to get a brief video of their entrance and love to watch it. You can see them enter and you can see Alli peak over at me. Most likely thinking that is my grandma sitting there.

Alli Down Stay at Vet with Katelyn

After observing for a short time, Katelyn brought Alli over to where I was sitting and I was finally able to give my sweet girl some loving. A week may not seem long to some but to me that was like an eternity. Katelyn sat down with me and went over everything Alli had done for the week. Yes, it was on Facebook but seeing and talking about her training and the methods used are two different things. We eventually went outside where Katelyn continued to share her vast knowledge of training and the continuing training that would need to be done in order for Alli to be a confident girl in her surroundings. I was so thankful for the extra time Katelyn took with me at the vet.

After leaving the vet I am proud I was able to stop by my mothers house to let Alli meet her Boxer Jack. Although we did not get to let her off the leash while we were there, I am happy to see her down stay while mom and I talked.

Meeting Jack

A few days after I picked Alli up from training we drove to meet my daughter in Tennessee. While in Tennessee they were able to go to a friend’s cabin for a spontaneous overnight stay. Though the meeting was scary for Alli, the shock wore off by the next morning and they were able to spend the entire day at the cabin. This would include play time with their children and Husky and playtime in the nearby creek, off the leash. Alli Tennesse TBDIf you are looking for an great trainer with reasonable rates, look no further than Katelyn Locklear Bishop at Klockwork Handling in Hope Mills, North Carolina. We are so pleased with the progress Alli has made during her week at Klockwork Handling, we will be scheduling follow up training sessions in the future with Katelyn whenever my daughter is in town.

Be sure to head on over to Klockwork Handling’s Facebook page and see all of the training photos of Alli in action to include her trip to the park and PetSmart. Then head on over to the Klockwork Handling website and view the extensive list of achievements Katelyn has achieved from the age of 7.

Alli River TBDEveryone is proud when they can teach their dog to sit and stay but in reality sit and stay are basic commands and only the beginning commands to a broad array of commands that can be taught. During Alli’s week at Klockwork Handling she would learn to sit stay, down stay, and EASE. We were never able to take Alli for a walk as she would literally walk us. Not anymore, with the new command ease introduced to her, Alli now lets us walk together, side by side.

This is only the beginning for Alli. In the future my daughter and her husband will need to continue with the training Alli received during her week at Klockwork Handling. Through continuing training and conditioning to public places, Alli will soon be able to go nearly anywhere.

Ms. Hildy and Her Custom Couture Dog Dress with Pick Ups

Tags

, , , , , , , , , , , , ,

My most recent custom order was for a very cute Golden Doodle named Hildy. While Hildy’s owner was searching Etsy, she found my listing for an Angel Blue Peachskin Couture Dog Dress with pick ups. She instantly inquired about getting a similar couture dog dress custom made for Hildy.

SONY DSC

With the owner’s wedding coming up in June she wanted something very special for Hildy, who would also be attending the wedding. After receiving Hildy’s measurements and the desired color choice I was able to get started.

I love to use peachskin fabric on special occasion dress for pets as the micro fiber fabric is soft, smooth, and moderately wrinkle-resistant. It’s also great for any season and weather due to its light weight and texture.

I was able to find a red peachskin locally along with all of the accents needed for the waist and for the pick ups. I purchased red and off white rose accents for the pick ups and the waist and I was able to find off white pearls to utilize as additional accents around the dress waist.

Within a week I was able to complete Hildy’s custom dog dress for her owner’s very special occasion in June. Hildy Dress (2) TBD

If you would like to place a custom order for yourself, child, or pet feel free to contact us for more information. Terms and Conditions

Laurie and Hildy TBD

Four Cheese, Broccoli, and Cauliflower Crock Pot Soup

Tags

, , , , , , , , ,

Broccoli Soup Cover

Ingredients:

  • 1 – 2 crowns of Broccoli
  • 1/4 – 1/2 head of Cauliflower
  • 5 cups water
  • 2 (12oz.) cans evaporated milk
  • 1 cup heavy whipping cream
  • 6 tbsp All-purpose flour
  • 1/3 cup butter
  • 1 1/2 cups sharp cheddar cheese
  • 1 cup mild cheddar cheese
  • 1/2 cup Parmesan cheese
  • 1/2 cup Romano cheese
  • Chicken bouillon granules
  • 2 tsp Tastefully Simple Onion Onion seasoning
  • 1 tsp. Tastefully Simple Garlic Garlic seasoning
  • Dried parsley for garnish (optional)

Broccoli Soup TiffanyBrooksDesigns

Directions:

1. Take 1 cup of cold water and add 3 tbsp. of flour. Whisk until there are no lumps and pour into crock pot. Repeat this step with 1 cup of cold water to use your remaining 3 tbsp. of flour. (Be sure your water is cold in order for your flour to mix in lump free.) *If using ready made chicken broth, scroll down for broth directions.

2. Take 1 cup of hot water and add your chicken bouillon granules. If using water, you will need to follow the packet directions to make five cups of broth. For the brand of granules I used I added 5 tsp. to 1 cup of water. Whisk until granules are dissolved and pour into crock pot.

3. Add all remaining ingredients: remaining 2 cups of water, butter, evaporated milk, heavy whipping cream, four cheeses, and seasonings into your crock pot and stir.

4. Take your crown of Broccoli and head of Cauliflower and cut into desired size and add to crock pot. Cover and let cook on high for about three – four hours.

To order you Tastefully Simple seasonings visit Debbie Yoho, my Tastefully Simple Consultant.

Broth Directions:

1. Take 1 cup of broth and add 3 tbsp. of flour. Whisk until there are no lumps and pour into crock pot. Repeat this step with 1 cup of broth to use your remaining 3 tbsp. of flour. (Be sure your broth is room temperature in order for your flour to mix in lump free.)

2. Add all remaining ingredients: remaining 3 cups of broth, butter, evaporated milk, heavy whipping cream, four cheeses, and seasonings into your crock pot and stir.

3. Take your crown of Broccoli and head of Cauliflower and cut into desired size and add to crock pot. Cover and let cook on high for about three – four hours.

Broccoli Soup Finished

DIY, Burlap Wreath Tutorial

Tags

, , , , ,


Burlap Wreath Tutorial Cover

I have made plenty of wreaths over the years but never with burlap. I researched a few tutorials I came across on Pinterest and decided to try a few of the techniques used. After a few hours and several different techniques I was about to give up on making a new Christmas wreath. Eventually I came up with my own technique that gave me the fluffy looking burlap wreath I was envisioning.

I have made plenty of wreaths over the years but never with burlap. I researched a few tutorials I came across on Pinterest and decided to try a few of the techniques used. After a few hours and several different techniques I was about to give up on making a new Christmas wreath. Eventually I came up with my own technique that gave me the fluffy looking burlap wreath I was envisioning.

Supplies Needed:Supplies

  • floral wire or pipe cleaner
  • scissors
  • wire wreath
  • burlap


I believe my wire wreath frame was 24″. Since my frame was so large I used two rolls of 6″ x 10 yd rolls of burlap ribbon from Linen Table Cloth.


Step 1

This is one technique I did find in another tutorial that I really liked.

Cut a piece of wire about 10″ long and carefully weave the wire through the burlap. Once you have weaved the wire through the burlap, hold both ends of the wire and slide the burlap towards the center of the wire. Once gathered, secure the gathers by twisting the wire tightly around the burlap.

Step 1 Gathered

Using the same wires you secured your gathers with, you can now attach to the outer edge of your wreath frame. Step 2 Attached to WreathMeasure Burlap

I wanted all of my loops to be a close to the same size so I devised my own method to measure the sections before I wired the loops to the frame. You can certainly eyeball your loops or use a ruler.  I utilized two of the sections lengthwise to get the same length for each of my loops prior to wiring my loops to my frame. Be sure to cut your wire long enough to form your loop and to secure it to the frame.


StepsAfter you have your burlap measured to your desired loop size, you will attach the wire used to make your loop to the third section of frame.

You will repeat this process: outer edge to third frame section. I never attached any of my loops to the second or inner frame edge.

In one of my previous attempts I triedto attach my loops to all four sections and my loops were not as puffy as I wanted them.

Be sure not to tie your wire to tight as you want your loops to move freely on the frame. This will not affect your finished wreath.

Finished No Bow

Now that I have completed looping my burlap around the entire frame, I can move the loops around as needed and fluff the loops.

Bow

The best part of making my own wreaths is selecting the ribbon for my bows.

Fortunately, after Christmas last year I was able to get a great deal of Christmas ribbon at Michael’s Craft Store. I had so many different spool of ribbon to chose from I could barely decide.

Finished with BoxFor my wreath I do not want to add anything other than a bow. If I had chosen a smaller wreath frame I might have added berries or holly.

Now it’s time to hang my new Christmas wreath outside and enjoy it!

Christmas Burlap Wreath Finished (1)

I hope you have found my tutorial helpful. Stay tuned for my next tutorial, How to Make A Bow!

Fried Potato Spanish Tortilla

Tags

, , , , , ,

Growing up this was one of my favorite dishes my mother made. The best part about this dish, it doesn’t have to be breakfast time.

I have to admit, when I make Garlic Fried Potatoes, I purposely make too much just so I can make myself a tortilla the next day. If you do not have any left over fried potatoes, use my Garlic Fried Potatoes recipe and make yourself some. I promised you won’t regret it!

20141117_081927

Ingredients

  • Leftover fried potatoes (about one cup)
  • 2 eggs
  • No-Stick cooking spray
  • Sour Cream (optional)
  • Shredded Cheese (optional)
  1. In a small frying pan, add your leftover potatoes and reheat. Since I am using my leftover Garlic Fried Potatoes, there is no need for me to add any additional seasoning.

20141117_075757

  1. While your potatoes are reheating, scramble your two eggs in a medium bowl.

20141117_075802

  1. Once your potatoes are heated all the way through add them to your scrambled eggs and stir.

20141117_081001 20141117_081026

  1. Spray your frying pan and pour your potato and egg mixture in. Heat on low, to allow the eggs slowly cook through to center.

20141117_081050(0)

  1. As the egg slowly cooks, use a rubber spatula to lift the tortilla from the frying pan. When it seems your eggs are cooked through to the center you will need to flip your tortilla over. I personally gently slide my tortilla on to a plate and place the frying pan upside down on top of my plate. I then carefully flip it back over so that the uncooked side of the tortilla can now finish cooking. Since the egg is cooked through to the center, or more, this is not a messy step.

20141117_081503

  1. Cook for a few minutes and slide out of your frying pan on to your plate. Now you are ready to top with sour cream and shredded cheese.

20141117_081538

20141117_081840
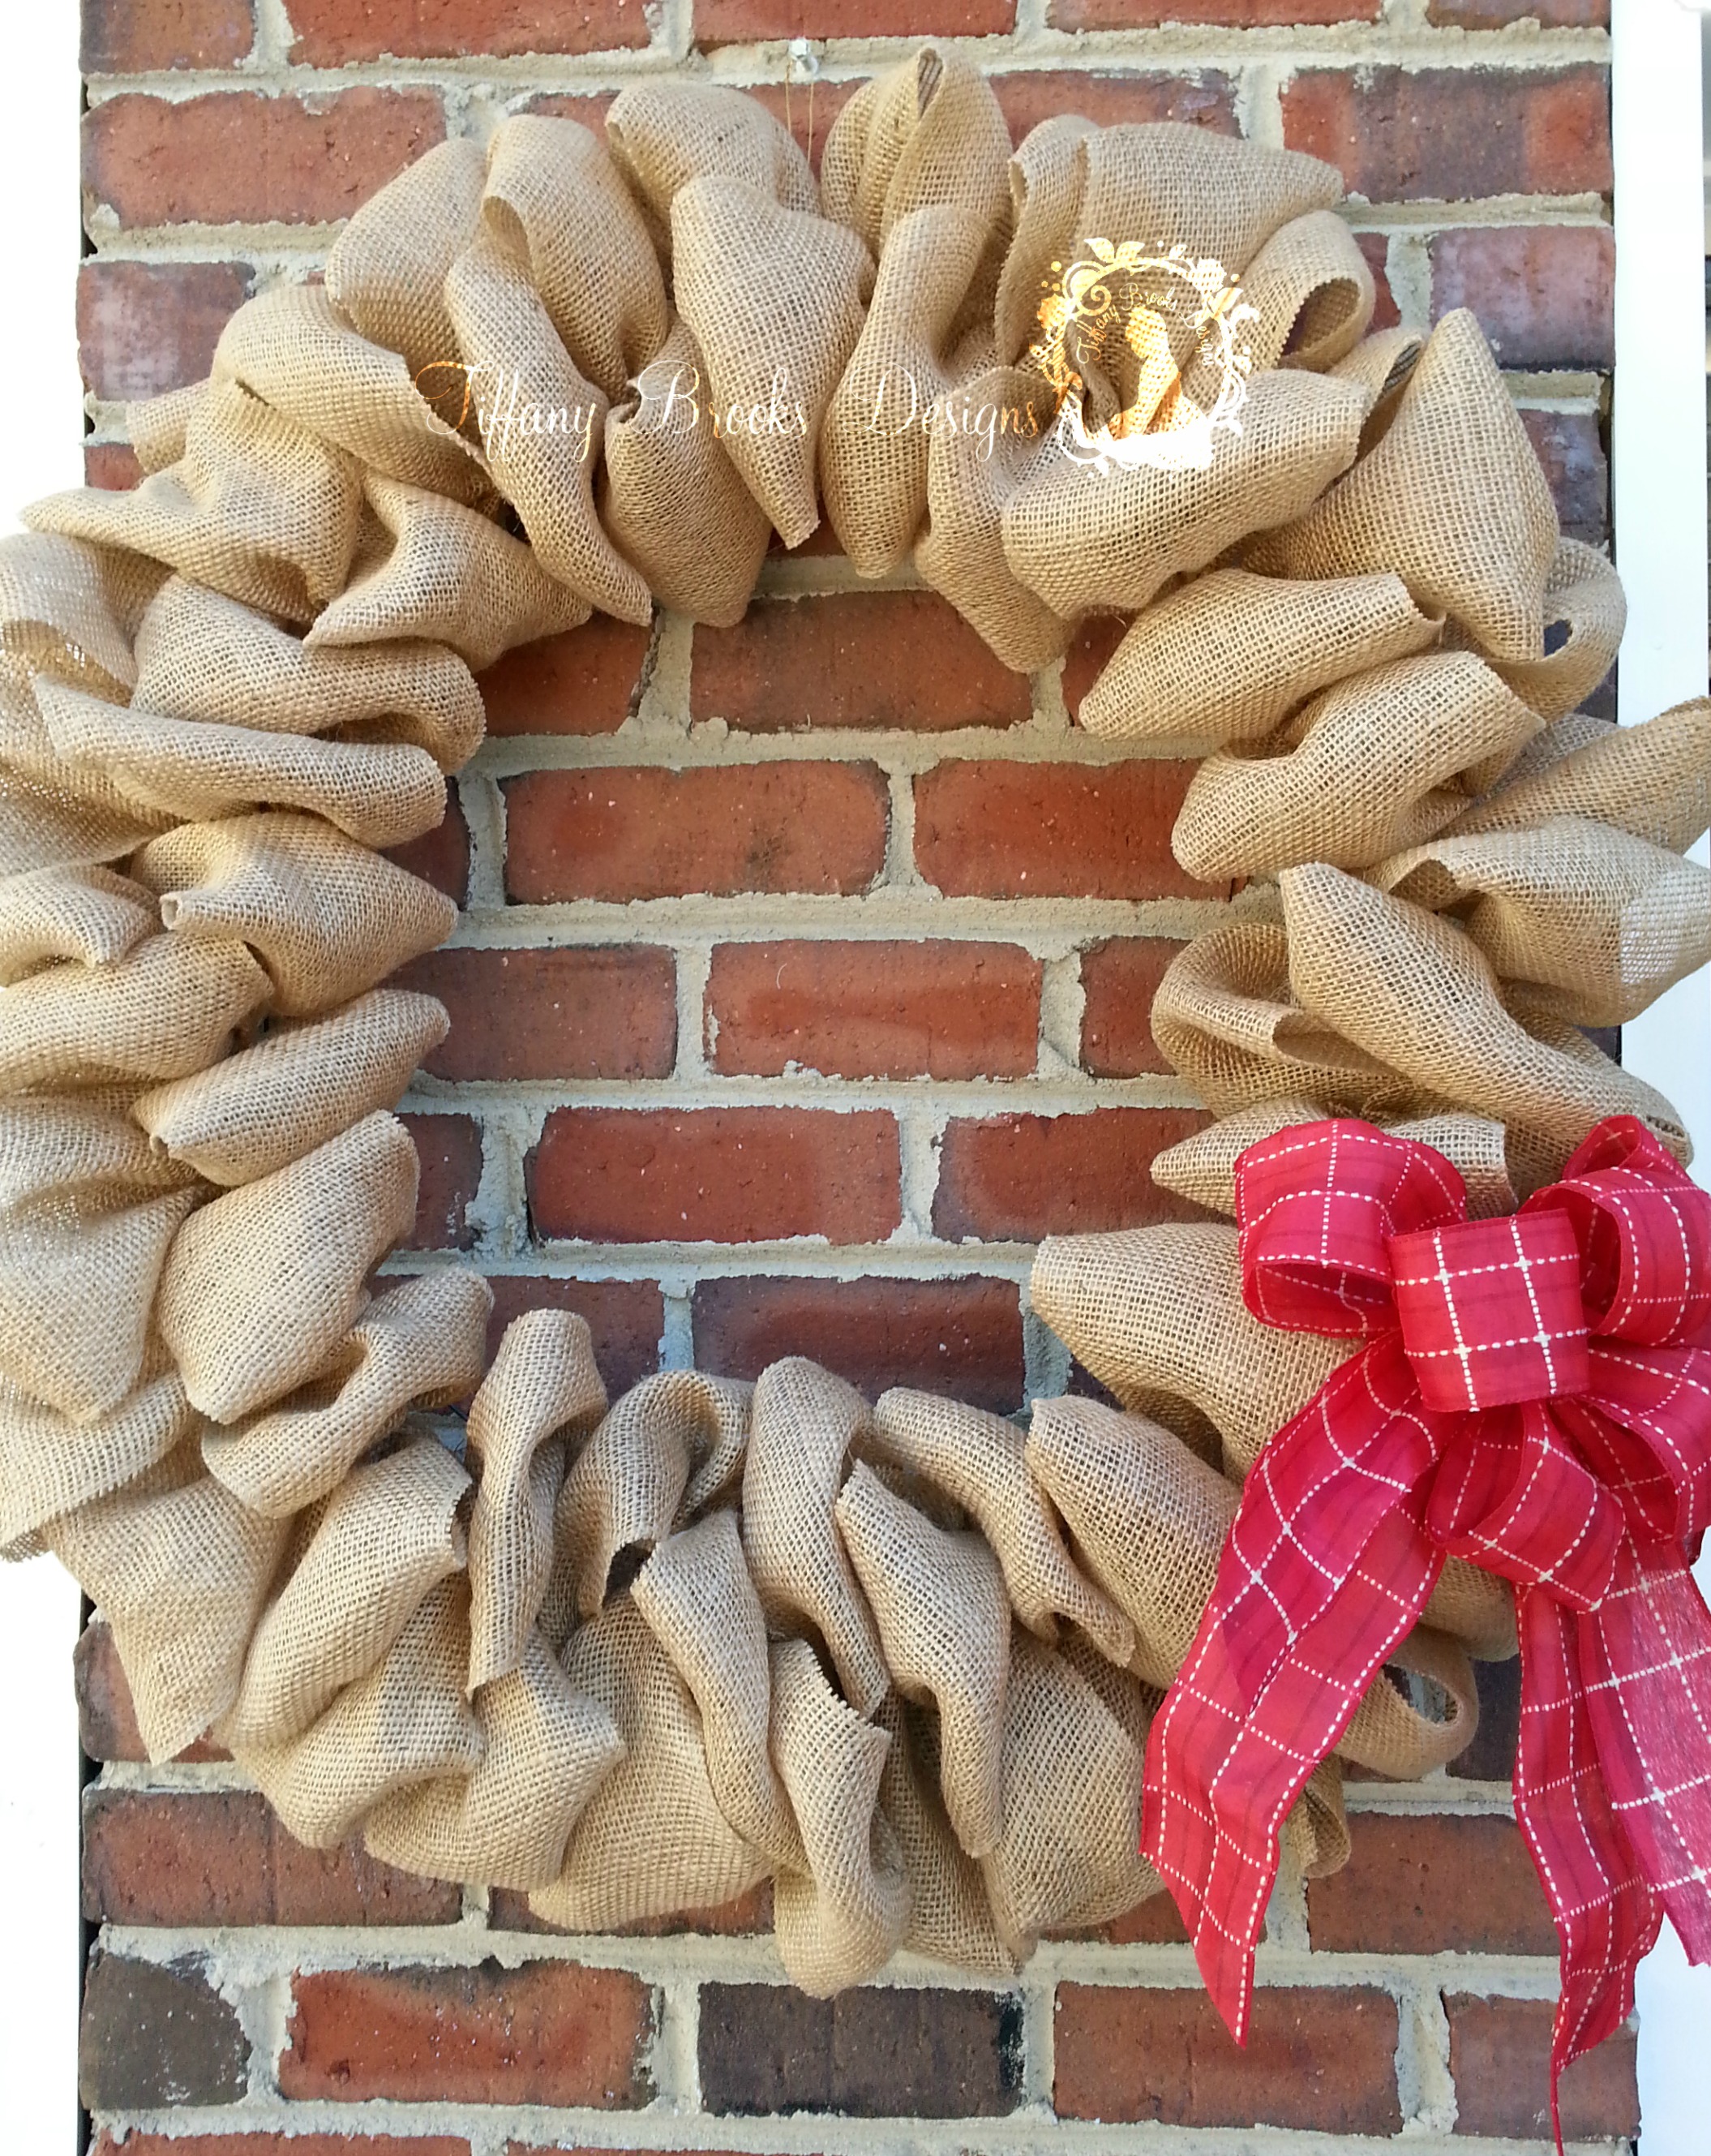
Optional things to add in to your scrambled egg mixture: cooked bacon, peppers, mushrooms, and sausage. If you are going to add any of the above ingredients, be sure to add them in during step three. If you are using any type of meat product, be sure you have fully cooked it to the required temperature before adding to your potato and egg mix.


The Perfect Garlic Fried Potatoes

Tags

, ,

As many southerners do, I LOVE fried potatoes! Here is a simple and easy fried potato recipe you might enjoy.

Fried Potato TBD

Ingredients

  • 4 – 6 small/ medium potatoes
  • small sweet onion
  • 2 tsp. Garlic Garlic from Tastefully Simple
  • 1 tsp. parsley
  • 1 tsp. paprika
  • salt and pepper as desired
  • Olive Oil

Directions

In a medium – large frying pan or skillet add enough olive oil to coat the bottom of the pan. Turn on low to allow oil to slowly warm while you prepare your potatoes.

Peel, wash, and dice your potatoes. Chop your sweet onion in to desired size. Add potatoes to oil. Gentle sprinkle in your Garlic Garlic, parsley, paprika, salt and pepper.

Cook until potatoes are tender and brown.

Makes approximately four servings

Did you make too many potatoes and don’t know what to do with them? I may have the solution you have been looking for in my Fried Potato Spanish Tortilla recipe. Enjoy!


How to Make a Steampunk Costume on a Budget

Tags

, , , , ,

Utilizing as many supplies that I already had on hand was essential in keeping down the cost for my steampunk costume this year. I want to be able to create and entire costume with accessories for under $50.00 dollars. The main costume would be made by recycling this unused black formal dress. By cutting the dress at the waist line, I now have a corset top and a skirt.


I added a zipper and a waistband to the skirt. The length was perfect so there was no need to hem as I never cut the bottom of the skirt. I then added a sequin lace trim to the bottom of the skirt. My skirt is now complete.

The corset top took a little more time than the skirt as there were several things that had to be added. I first added a separating zipper to the back of the top. I then added a gathered brocade trim to the bottom of my top to add a little extra length. I added matching straps to ensure I would be comfortable in my costume throughout the entire festival. Finally, I added a sequin and beaded trim to the top of the corset to add just a little more height to the top.

Now its time to make my bustle using the same brocade fabric I purchased for the corset top trim. Since the bustle is detachable from the skirt it will have it’s own waist band. This will make it easier to use this costume for other festivals.


Now I am finished with my main steampunk costume but I need a jacket. So back to my closet for something else that can be recycled. As I had hoped, I found the perfect jacket that I haven’t worn in years. First I shortened the sleeves to 3/4 and added a pleated black polyester trim. Even with the shortened sleeves and black trim, the jacket was still a little too plain for the rest of my costume. By adding elastic bridal button tape down two seams on the back of the jacket, I was able to give the jacket a lace up corset look. Now this completes the jacket.

Now my costume is ready for opening day of The Annual Carolina Renaissance Festival.

I was able to make this entire costume: corset top, skirt, jacket, bustle, for only $ 14.08. My accessories for my purse, hat, and necklace cost $28.74, keeping my costume and accessory total under my $50.00 budget. Being able to recycle the dress, purse, necklace, and utilized items I already had on hand I saved a lot of money.

Total steampunk costume and accessory break down:

  • Costume $14.08
  • Steampunk hat $10.33
  • Gear and clock key necklace $3.61
  • Purse $14.80

For a total of $42.82 I have a complete 3 piece Victorian steampunk costume with matching accessories.

Check out my other blogs to learn how I made my hat and necklace.

How to Make a Steampunk Hat

How to Make a Steampunk Necklace


How to Make a Steampunk Hat

Tags

, , ,

I first had to decide what did I want on my hat. Most steampunk hat’s I have seen on the internet had goggles on the hat and I wanted to do something different.

Supplies

  • Gears
  • Old clock (optional, for real gears)
  • Flowers
  • Feathers
  • Clock Keys
  • Clock hands
  • Trim
  • Hat
  • Hot glue gun
  • Other steampunk accessories
  • Vinegar (optional for tarnishing gears)

I looked at several craft stores for gears but not many carried real looking gears. So my next option was to take apart an old clock that was in the closet. After removing all of the gears from the clock, I realized they needed to be slightly tarnished. In order to slightly tarnish the gears, I dipped them in apple cider vinegar a few times and allowed to air dry in between dipping.


I found the perfect mini top hat at Wal-Mart in the costume section. The hat already had a ribbon band and tulle so I just removed it as it would not match my steampunk costume theme. I had just enough trim left over from my steampunk costume to use as a hat band. Using hot glue, I attached the trim to the hat.


After the hot glue was cool I started to decorate. I placed all my accessories on my hat prior to hot gluing them. This would save time and supplies if I didn’t like the completed look of my hat.

Here is my completed steampunk hat. I absolutely love everything about my hat and I cannot wait to make another one.

Total hat cost was $10.33. The only items I had to purchase to make this hat was the hat, brown feather pick, and the clock keys. All other accessories I already had on hand.

Be sure to check out my completed steampunk costume and necklace.

How to Make a Steampunk Costume on a Budget

How to Make a Steampunk Necklace

How to Make a Steampunk Necklace

Tags

, , ,

I love recycling items I already have on hand when I am making costumes and accessories. For my steampunk necklace I was able to recycle a necklace I haven’t worn in years.

Supplies

  • Old necklace (jewelry making starter kit)
  • Needle nose pliers
  • Gears
  • Keys or other accessories

Utilizing needle nose pliers, I was able to careful take apart the old necklace and add gears and clock keys I bought at Michaels Craft Store.


Now I have a steampunk necklace that I can use time after time. I also can add to this necklace at any time. Total necklace cost $3.61. It is just amazing how much money can be saved by utilizing as many things you already have on hand.

You can make all kinds of steampunk jewelry out of old jewelry or by purchasing a jewelry making starter kit from your local craft supply store.

Be sure to check out my other blogs.

How to Make a Steampunk Costume on a Budget

How to Make a Steampunk Hat

Elephant Tutu, Tiger Tutu, Dinosaur Tutu, Animal Halloween Costume Tutus

Tags

, , , , , , , , , ,

One of my favorite tutus to make are Halloween costumes. On an afternoon trip to Michaels Craft store one afternoon, I came across these cute animal ear and tail sets. The best part about these tutu costumes is that they make the sounds of the animal when you bush a button.

SONY DSC SONY DSC


Elephant tutu features yards and yards of grey tulle on an elastic waist band. Set includes elephant tail and head band that makes elephant sounds when you squeeze the ear. Tail is tied on to tutu with white satin ribbon for easy removal.  


Tiger tutu features yards and yards of golden yellow and black tulle on an elastic waist band. Set includes tiger tail and head band that makes tiger sounds when you squeeze the ear. Tail is tied on to tutu with yellow satin ribbon for easy removal.


SONY DSC


Tiger tutu features yards and yards of green tulle on an elastic waist band. Set includes dinosaur tail and head band that makes dinosaur sounds when you squeeze the ear. Tail is tied on to tutu with green satin ribbon for easy removal.


For complete item description, including size and availability please visit my Etsy shop.

Elephant tutu set Halloween costume

Tiger tutu set Halloween costume set

Dinosaur Tutu set Halloween costume

Design a site like this with WordPress.com
Get started